Bike chain tools are not exactly what a cyclist must always carry with them but they are the essentials for anyone. They can solve your emergency on the road or help with the mechanic work at home. In general, if you are a cyclist, we highly recommend that you purchase one and learn how to use bike chain tools in a proper way.
In case you have yet to know how to use these tools, we have got your back. Down below is a complete guide on using a bike chain tool (in both breaking a chain and linking one). Now let's waste no more time and take the discussion further!
What Is A Bike Chain Tool?
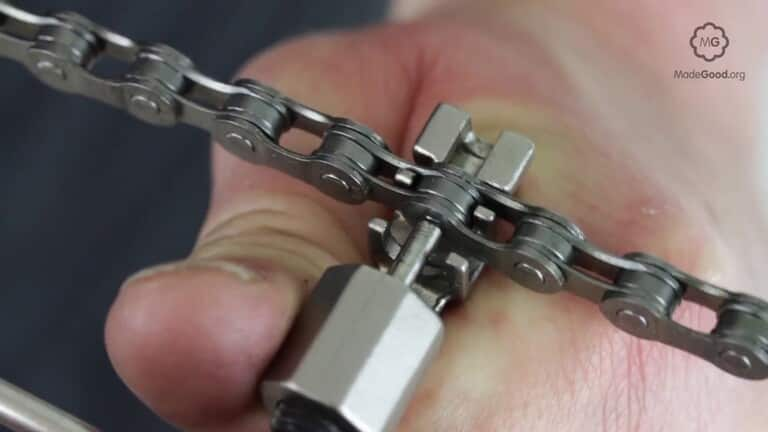
The bike chain tool term has pretty much spoken for itself. As it is called, a bike chain tool's functions have something to do with breaking and linking a chain. Some would put it as a bike chain tool that can help to break a chain the same way as it mends one. That's the general explanation for what a bike chain tool is and what it does.
The bike chain tool is certainly applied on numerous occasions for both cyclists and mechanics. Believe it or not, even when you are not cycling but dealing with DIY projects or running a garage, a bike chain might take you further than expected in daily life.

More about bike chain tools
Bike chain tools, like any other items, have several sizes to adapt to users' demands. And it is not distorted truth when saying the demand for bike chain tools is increasing day by day. This is because of the rocketing number of people taking up cycling as a hobby or daily exercise. It is simple, affordable, and beginner-friendly for most workout routines, especially when you are not participating in any professional tours.
For its price range, you can buy a single bike chain tool for 12 dollars. Or else, you can make a 24-dollar purchase for a full set of bike chain tools. The package will then come with additional accessories or the chain tool may come in different sizes to fit your usage demands.

How to Use Bike Chain Tools Correctly?
Here comes the major part of our article on how to use bike chain tools properly. We highly recommend cyclists, whether new or experienced but have yet to maneuver with the item before reading this section carefully. With solid information, you may save yourself a lot of trouble relating to chains.
Using a bike chain tool to break a chain
Step 1: Placing your chain on the tool
The bike chain tool is designed with a knob so that you can maneuver any adjustment toward the tool pin. Adding to that, you can make a slot to place the chain on the bike chain tool. There are two sections on the slot, which include the inner and the outer ones. Many people have raised a question considering the fact that we will only use one section later in our process of breaking a chain with the bike chain tool.

Now you need to place the link you wish to disconnect on the breaker tool (aka the bike chain tool we have here). You will also need to make use of the outer slot (mentioned earlier), being further away from the knob and handles. Turning the knob to adjust the tool's pin until it has reached the link is what to do next.

Step 2: Pushing the chain pin out slowly and mildly
The tool's pin is likely to push the pin or rivet out as you turn the knob further. Via this, the link will become undone. After that, you should start to turn the knob at the half turns. In this step, you must concentrate and be extra careful since you cannot push the rivet out too quickly.
A sense of increased resistance will take place at some point during your process. That is completely normal. It is actually a precise sign that the chain pin is on the verge of getting pushed out entirely. Don't worry and keep on with what you're doing.

Step 3: Removing the current link
For the last step, which we call removing the link, you should turn the knob all its way through to push out the pin completely (if that's what you are after). But in case you are aiming at relinking the chain and using the current section, it is better for you not to push out the pin entirely.
To avoid the mistaken "complete removal of the pin", place a limit for yourself at the half turn right after you feel the tension as aforementioned. As you enter the "resistance" phase with a half-turn, the link should be good enough for removal.
For the final tasks of breaking a chain, manually twist the link a little bit to remove it. You will also find out that with just a mild force of your hand, you can easily make the pin hinge into the slot and come off entirely.

Using a bike chain tool to link a chain
Step 1: Placing the chain
When wanting to relink the chain, you need to start by connecting the two sides. Twisting the two ends together and getting them fit is what to do next. At this point, the two sides should snap into the right palace without trouble.
After that, you have to readjust the tool's pin to clear it from the slot and place the chain onto the outer once again. Your chain pin had better stick out on one side of the link, facing the tool pin. Keep making adjustments until the tool pin reaches the chain pin. We are halfway through.

Step 2: Adjusting the knob
In the second step, as we call it, adjusting the knob, you need to turn the knob to push the chain pin into the link. Then, you have to get it through to the other side. To successfully link the chain, you have to aim at having a bit of the pin sticking out on the two sides of the chain.
Follow it up, remove the chain from the slot, and double-check the linked section to verify whether it is loose enough to give permission to the motion or not. Being too stiff or tight is now what we are looking for. Should that be your situation, you will have to put a little more effort to adjust the chain pin. This is exactly where the inner slot comes into use.
At this point, place the chain onto the inner slot and go for minor turns in terms of adjustment. Check for its tightness after every turn you make. Once the link is loose enough for any movement, your adjustment process has reached the finish line.

The Bottom Line
There you have the complete guide on how to use the bike chain tool to break and link a chain. Once again, we highly recommend those who are cyclists purchase a bike chain tool for such situations. They can be rare occasions, but isn't it better to be prepared?
We have so many more instructions and tips waiting for you to unfold. Therefore, don't forget to follow us and send us a message at any time, if you have any concern that needs to be consulted.


